Make sure the tubing is fully inserted (about 0.8). Starting and Stopping Frequently Reminder: The RO system will perform a starting and stopping frequently reminder when the booster pump is frequently started and stopped in 20 minutes. Locate a flat surface on which to place the system housing. Check all tubing for crimps and remove them. Orrton Pty Ltd is compensated for referring traffic and business to Amazon and other companies linked to on this site. Put the new filter in and press the locking handle downward you should hear a snap sound.  The error code E03 on the waterdrop RO system means that the booster pump is overworked due to a leak in the tubing connection between the system and the RO faucet. Reset filter life indicator by holding the correct filter light (representing the corresponding filter that you changed) for 5 seconds until you hear a beep.
  Check for water leakage which could cause it to work continuously. The filter life indicator will be permanent blue. The feed water pressure is no less than 14.5 psi and no longer than 87 psi; 2. Slip the front plate to one end of the tubing (without mark), and insert the tubing into the drilled hole up to about 0.6 (Figure 7); Fix the drain saddle with screws and install the lock clip on the fitting to secure the connection (Figure 8); NOTE: In some areas, the waste water tubing needs to be connected to the drainpipe through the air gap. To find the leak, inspect all joints, fittings, and tubing connections.
  Hold power button for 3 seconds until indicator light comes on and you hear a ding sound. Discard the first 4 tanks worth of water and if the 5 tank looks clear it is ready for drinking. Section 3: Filter Replacement GuideNOTE: If the filter expires, please purchase and replace the filter immediately. On both the INLET and DRAIN ports, connect the L Quick-Connect Fittings. If you have replaced a filter, you only need to flush that particular filter not all filters. Error code E05 means the system has been heating water for an extended period of time. Use mounting washer or decorative base (for K6 only). Lastly, insert the power plug into the socket and turn it on. We are not responsible for damage in transit, and claim that such damage should be presented to the carrier by the customer.The warranties set forth herein are the only warranties made by us with respect to the product. You may notice some black water in first tank filling this is normal. Gently tighten the plastic nut underneath. Release the indicator when you hear a beep. Insert new filter and push locking handle down you should hear a snap as it locks into place.
  Home Waterdrop Waterdrop Reverse Osmosis Water Filtration System Instruction Manual, Find the installation videoSearch Waterdrop G2 undersink RO installation on, Visit warranty.waterdropfilter.com and enter the product serial number:Any questions, please contact us. Well also cover the Waterdrop error codes for each system and how to fix them and where you can buy replacement filters. MNR Replacement Fit for G2 G2MNR, G2P600, G3, G3P800, D4, D6. You will need: Unwrap your RO system package and confirm you have all the components required to install your RO system. if(typeof ez_ad_units!='undefined'){ez_ad_units.push([[300,250],'waterpurificationguide_com-banner-1','ezslot_2',113,'0','0'])};if(typeof __ez_fad_position!='undefined'){__ez_fad_position('div-gpt-ad-waterpurificationguide_com-banner-1-0')}; Note: All the three tubes have a black mark on them; make sure the tubes are fully inserted until they reach the mark. NOTE: If the tubing is too long, cut it to a suitable length with a sharp utility knife or scissors. Twist the filter that needs to be replaced counterclockwise (Figure 13); Remove wrappings and protective cap from the new filter; Insert the filter into its corresponding hole, aligning the arrow with the empty circle on the housing; Twist the filter with a little force forward in a clockwise direction for 90 degrees, until the arrow is aligned with the solid circle on the housing. Check all tubing for any kinks, crush or pinch points. If the pipe has a half-inch connection, unscrew the two converters from both ends before connecting it to the cold water supply valve and tightening it with the adjustable wrench.
  Note: The indicator light button will be the CF, CB, RO, MRO or KJF button, but this depends on which you are replacing. After this, the system will stop making water. Make sure the tubing is securely and firmly placed into the quick-connect fitting. Meanwhile, the CF and MRO filter life indicators flash red. If you choose to keep it, you agree that the above limitations still apply to you.Warranty RegistrationPlease visit our website www.waterdropfilter.com and go to the Warranty Registration tab to register your product for the warranty. After powering on, the heating tank should automatically fill for ~3 minutes. We would greatly appreciate your voice and support. Flush the changed filter the CF filter will flush automatically for 5 mins. Apply downward pressure firmly to the bit until breaking through the surface; Starting at the lowest speed, hold the drill straight with firm pressure to prevent the bit from walking on the counter; Once breaking through the surface, swirl the drill a little to apply pressure in a circle evenly. Check the filter life indicators to see which filters need to be replaced and replace them as soon as possible.
  Your satisfaction is our top priority! Comment document.getElementById("comment").setAttribute("id","a142a5731c152db0d024fffc1fb9fcaf");document.getElementById("afe6277d1c").setAttribute("id","comment"); Save my name, email, and website in this browser for the next time I comment. Add the pressure relive valve to the INLET water tube (under the sink) somewhere where it wont get in the way. There are three types of ports: Begin by removing all of the plugs, but instead of pulling them out directly, press and hold the lock sleeve as you take it out. The E9 error code is displayed on the smart faucet (D6 system) if the faucet is turned on but does not receive the correct information for 5 seconds It will make the system go into standby mode after 1 minute. When youre finished, make sure to reset the indicator by holding the reset button to select the CF or MRO filter until it flashes. After removing the wrapping and plastic cap on the new filter, place it in the correct hole and turn clockwise. This article will take you through how to install ALL the Waterdrop reverse osmosis systems, give a step-by-step guide on how to flush the system, and provide instructions on how to change a filter on a Waterdrop RO system. Remove the blue lock clip from the fitting; Use your thumb and index finger to press down on the lock sleeve. * Your assessment is very important for improving the workof artificial intelligence, which forms the content of this project. Pull locking handle out and up (a) and use filter handle to remove used filter (b). If you are using well water as the source, please ensure that the feed water has been through a pre-filtration system. Press power button again for 3 seconds to restart system flushing will automatically occur for 25 seconds. Get a towel or bucket to catch water. Use your other hand to pull out the tube from the fitting (Figure 2). Our obligation does not include the cost of transportation.
 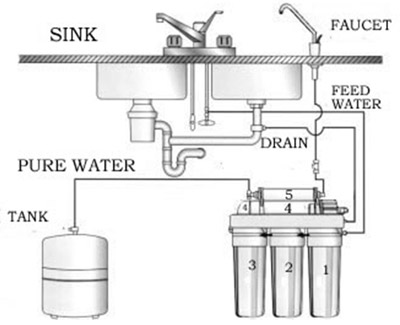 As discussed above, if you follow the offered instructions, installing the RO system is simple. Do this by inspecting all joints, fittings, and tubing connections. Place the rear plate on the drain pipe and use a screwdriver to evenly tighten the screws and nuts while keeping the tubing in the hole. Check and ensure all tubing is installed correctly and completely. Remove wrapping and plastic cap on new filter(s). SystemDuration buttonG25 seconds reset buttonG37 seconds filter indicatorD43 seconds reset buttonD63 seconds reset buttonN15 seconds filter indicatorM5no reset buttonsK65 seconds filter indicator. NOTE: Make sure that there is a power outlet in the kitchen cabinet or on the wall connected to the lower cabinet space before installation. Can A Shower Filter Remove Bacteria? The feed water temperature must be no less than 41F and no more than 100 F; 3. Turn on the water supply valve or the feed water adaptor. If your N1 reverse osmosis system displays L1 it can mean either: The error code EO2 on the K6 waterdrop RO system indicates that there is an interior water leakage. Be sure to reset the filter life indicator every time you replace your filter.Display Status: NOTE: The indicators will notify you according to the usage time or processing capacity of the filters, whichever comes first. Secure the fitting using the locking clip.
  Waterdrop is one of the best brands available and its important to know how to install your Waterdrop RO system correctly. Consumers need to purchase additional air gap accessories. If your RO system entails the UV sterilizer plug, you can also connect the UV sterilizer into the system. Check the water container in the back to see if it has any water and if this is the case, clean the container and reinstall it.
  After confirming that you have all the necessities, you can now begin your installation. This limited warranty shall only be valid if: 1. The daily production rate is measured under 30 psi dynamic feed water pressure and 77 F water temperature. The system and filters will flush automatically, during which time the power and reset button will flash alternately for ~25 seconds (total time = 1 minute). The reset is completed when you hear a beep. A reverse osmosis system is a wonderful option if you need filtered water. Put the decorative connector cover back on. The system will also stop making water and the filtering indicator and power indicator lights will be off. Close top cover on system, replace water in feed tank, close tank cover. If the problem persists, contact Waterdrop customer support. The RO system must be connected to the COLD water supply ONLY. Your water usage may vary as well. Remember to wear safety glasses to protect your eyes while drilling the faucet hole. Turn the power off (press power button for 3 seconds). Locate the systems water ports. NOTE: If you replace the CF filter and MRO filter at the same time, turn on the faucet to flush for 30 minutes. The system will automatically filter water until the tank is full. Check out their latest deals at WaterDropFilters.com and get clean safe drinking water in your home today. The system needs to be powered on again to recover itself. Section 4: Malfunction DisplayOverworked Reminder: When the system continuously makes water for more than 30 minutes, the overworked reminder will be executed and the buzzer will beep for 3 minutes. To begin, place the spout of the faucet into the faucet body. When finished, the TDS reading will appear on the screen. Attempt to restart heating by pressing the heating button. Force the connector from the bottom of the thread so the decorative cover on top is exposed, then push the decorative cover horizontally to remove it. Also check to see if the cord is damaged if it is, contact Waterdrop customer support. Turn off feed water adapter so more water doesnt enter the system. Check for leaks; Turn on the faucet to let water run for 30 minutes until the filtering indicator on the front panel changes from flashing to permanent blue; NOTE: Be sure to carefully check the tightness of each part of the system while flushing. if(typeof ez_ad_units!='undefined'){ez_ad_units.push([[300,250],'waterpurificationguide_com-leader-1','ezslot_5',115,'0','0'])};if(typeof __ez_fad_position!='undefined'){__ez_fad_position('div-gpt-ad-waterpurificationguide_com-leader-1-0')}; After 30 minutes of continuous operation, the system will start beeping for 3 minutes.
The error code E03 on the waterdrop RO system means that the booster pump is overworked due to a leak in the tubing connection between the system and the RO faucet. Reset filter life indicator by holding the correct filter light (representing the corresponding filter that you changed) for 5 seconds until you hear a beep. Check for water leakage which could cause it to work continuously. The filter life indicator will be permanent blue. The feed water pressure is no less than 14.5 psi and no longer than 87 psi; 2. Slip the front plate to one end of the tubing (without mark), and insert the tubing into the drilled hole up to about 0.6 (Figure 7); Fix the drain saddle with screws and install the lock clip on the fitting to secure the connection (Figure 8); NOTE: In some areas, the waste water tubing needs to be connected to the drainpipe through the air gap. To find the leak, inspect all joints, fittings, and tubing connections. Hold power button for 3 seconds until indicator light comes on and you hear a ding sound. Discard the first 4 tanks worth of water and if the 5 tank looks clear it is ready for drinking. Section 3: Filter Replacement GuideNOTE: If the filter expires, please purchase and replace the filter immediately. On both the INLET and DRAIN ports, connect the L Quick-Connect Fittings. If you have replaced a filter, you only need to flush that particular filter not all filters. Error code E05 means the system has been heating water for an extended period of time. Use mounting washer or decorative base (for K6 only). Lastly, insert the power plug into the socket and turn it on. We are not responsible for damage in transit, and claim that such damage should be presented to the carrier by the customer.The warranties set forth herein are the only warranties made by us with respect to the product. You may notice some black water in first tank filling this is normal. Gently tighten the plastic nut underneath. Release the indicator when you hear a beep. Insert new filter and push locking handle down you should hear a snap as it locks into place. Home Waterdrop Waterdrop Reverse Osmosis Water Filtration System Instruction Manual, Find the installation videoSearch Waterdrop G2 undersink RO installation on, Visit warranty.waterdropfilter.com and enter the product serial number:Any questions, please contact us. Well also cover the Waterdrop error codes for each system and how to fix them and where you can buy replacement filters. MNR Replacement Fit for G2 G2MNR, G2P600, G3, G3P800, D4, D6. You will need: Unwrap your RO system package and confirm you have all the components required to install your RO system. if(typeof ez_ad_units!='undefined'){ez_ad_units.push([[300,250],'waterpurificationguide_com-banner-1','ezslot_2',113,'0','0'])};if(typeof __ez_fad_position!='undefined'){__ez_fad_position('div-gpt-ad-waterpurificationguide_com-banner-1-0')}; Note: All the three tubes have a black mark on them; make sure the tubes are fully inserted until they reach the mark. NOTE: If the tubing is too long, cut it to a suitable length with a sharp utility knife or scissors. Twist the filter that needs to be replaced counterclockwise (Figure 13); Remove wrappings and protective cap from the new filter; Insert the filter into its corresponding hole, aligning the arrow with the empty circle on the housing; Twist the filter with a little force forward in a clockwise direction for 90 degrees, until the arrow is aligned with the solid circle on the housing. Check all tubing for any kinks, crush or pinch points. If the pipe has a half-inch connection, unscrew the two converters from both ends before connecting it to the cold water supply valve and tightening it with the adjustable wrench. Note: The indicator light button will be the CF, CB, RO, MRO or KJF button, but this depends on which you are replacing. After this, the system will stop making water. Make sure the tubing is securely and firmly placed into the quick-connect fitting. Meanwhile, the CF and MRO filter life indicators flash red. If you choose to keep it, you agree that the above limitations still apply to you.Warranty RegistrationPlease visit our website www.waterdropfilter.com and go to the Warranty Registration tab to register your product for the warranty. After powering on, the heating tank should automatically fill for ~3 minutes. We would greatly appreciate your voice and support. Flush the changed filter the CF filter will flush automatically for 5 mins. Apply downward pressure firmly to the bit until breaking through the surface; Starting at the lowest speed, hold the drill straight with firm pressure to prevent the bit from walking on the counter; Once breaking through the surface, swirl the drill a little to apply pressure in a circle evenly. Check the filter life indicators to see which filters need to be replaced and replace them as soon as possible. Your satisfaction is our top priority! Comment document.getElementById("comment").setAttribute("id","a142a5731c152db0d024fffc1fb9fcaf");document.getElementById("afe6277d1c").setAttribute("id","comment"); Save my name, email, and website in this browser for the next time I comment. Add the pressure relive valve to the INLET water tube (under the sink) somewhere where it wont get in the way. There are three types of ports: Begin by removing all of the plugs, but instead of pulling them out directly, press and hold the lock sleeve as you take it out. The E9 error code is displayed on the smart faucet (D6 system) if the faucet is turned on but does not receive the correct information for 5 seconds It will make the system go into standby mode after 1 minute. When youre finished, make sure to reset the indicator by holding the reset button to select the CF or MRO filter until it flashes. After removing the wrapping and plastic cap on the new filter, place it in the correct hole and turn clockwise. This article will take you through how to install ALL the Waterdrop reverse osmosis systems, give a step-by-step guide on how to flush the system, and provide instructions on how to change a filter on a Waterdrop RO system. Remove the blue lock clip from the fitting; Use your thumb and index finger to press down on the lock sleeve. * Your assessment is very important for improving the workof artificial intelligence, which forms the content of this project. Pull locking handle out and up (a) and use filter handle to remove used filter (b). If you are using well water as the source, please ensure that the feed water has been through a pre-filtration system. Press power button again for 3 seconds to restart system flushing will automatically occur for 25 seconds. Get a towel or bucket to catch water. Use your other hand to pull out the tube from the fitting (Figure 2). Our obligation does not include the cost of transportation. As discussed above, if you follow the offered instructions, installing the RO system is simple. Do this by inspecting all joints, fittings, and tubing connections. Place the rear plate on the drain pipe and use a screwdriver to evenly tighten the screws and nuts while keeping the tubing in the hole. Check and ensure all tubing is installed correctly and completely. Remove wrapping and plastic cap on new filter(s). SystemDuration buttonG25 seconds reset buttonG37 seconds filter indicatorD43 seconds reset buttonD63 seconds reset buttonN15 seconds filter indicatorM5no reset buttonsK65 seconds filter indicator. NOTE: Make sure that there is a power outlet in the kitchen cabinet or on the wall connected to the lower cabinet space before installation. Can A Shower Filter Remove Bacteria? The feed water temperature must be no less than 41F and no more than 100 F; 3. Turn on the water supply valve or the feed water adaptor. If your N1 reverse osmosis system displays L1 it can mean either: The error code EO2 on the K6 waterdrop RO system indicates that there is an interior water leakage. Be sure to reset the filter life indicator every time you replace your filter.Display Status: NOTE: The indicators will notify you according to the usage time or processing capacity of the filters, whichever comes first. Secure the fitting using the locking clip. Waterdrop is one of the best brands available and its important to know how to install your Waterdrop RO system correctly. Consumers need to purchase additional air gap accessories. If your RO system entails the UV sterilizer plug, you can also connect the UV sterilizer into the system. Check the water container in the back to see if it has any water and if this is the case, clean the container and reinstall it. After confirming that you have all the necessities, you can now begin your installation. This limited warranty shall only be valid if: 1. The daily production rate is measured under 30 psi dynamic feed water pressure and 77 F water temperature. The system and filters will flush automatically, during which time the power and reset button will flash alternately for ~25 seconds (total time = 1 minute). The reset is completed when you hear a beep. A reverse osmosis system is a wonderful option if you need filtered water. Put the decorative connector cover back on. The system will also stop making water and the filtering indicator and power indicator lights will be off. Close top cover on system, replace water in feed tank, close tank cover. If the problem persists, contact Waterdrop customer support. The RO system must be connected to the COLD water supply ONLY. Your water usage may vary as well. Remember to wear safety glasses to protect your eyes while drilling the faucet hole. Turn the power off (press power button for 3 seconds). Locate the systems water ports. NOTE: If you replace the CF filter and MRO filter at the same time, turn on the faucet to flush for 30 minutes. The system will automatically filter water until the tank is full. Check out their latest deals at WaterDropFilters.com and get clean safe drinking water in your home today. The system needs to be powered on again to recover itself. Section 4: Malfunction DisplayOverworked Reminder: When the system continuously makes water for more than 30 minutes, the overworked reminder will be executed and the buzzer will beep for 3 minutes. To begin, place the spout of the faucet into the faucet body. When finished, the TDS reading will appear on the screen. Attempt to restart heating by pressing the heating button. Force the connector from the bottom of the thread so the decorative cover on top is exposed, then push the decorative cover horizontally to remove it. Also check to see if the cord is damaged if it is, contact Waterdrop customer support. Turn off feed water adapter so more water doesnt enter the system. Check for leaks; Turn on the faucet to let water run for 30 minutes until the filtering indicator on the front panel changes from flashing to permanent blue; NOTE: Be sure to carefully check the tightness of each part of the system while flushing. if(typeof ez_ad_units!='undefined'){ez_ad_units.push([[300,250],'waterpurificationguide_com-leader-1','ezslot_5',115,'0','0'])};if(typeof __ez_fad_position!='undefined'){__ez_fad_position('div-gpt-ad-waterpurificationguide_com-leader-1-0')}; After 30 minutes of continuous operation, the system will start beeping for 3 minutes.